Local recording allows users to record meeting video and audio locally to a computer. The recorded files can be uploaded to Google Drive where UNC Asheville has unlimited storage space. Local recording and Google Drive storage is recommended due to storage limitations and cost of Zoom Cloud storage. This article describes 'starting a local recording', 'uploading files and folders to Google drive', and 'sharing files from Google drive'.
Starting a Local Recording
Steps
The host must record the meeting or grant the ability to record to a participant.
1
Start a Zoom meeting as the host.
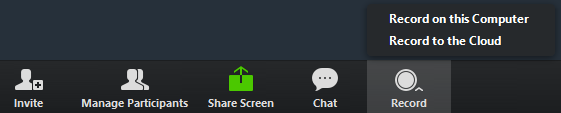
Click the option to Record. If there is a menu, select Record on this Computer.
2
Hosts and participants will see a recording indicator in the top-left corner while recording is active. Note: Dial-in participants will hear a message informing them that the meeting is now being recorded unless disabled by the host.
After the meeting has ended, Zoom will convert the recording so you can access the files. Note: Do not interrupt this process. Leave the computer powered on through this process.
Once the conversion process is complete, the folder containing the recording files will open. Note: By default, the audio/video file (MP4) will be named Zoom_0.mp4. The audio only file (M4A) is named audio_only.m4a.
Note:
If the meeting unexpectedly shuts down or if the conversion process is interrupted, the recording files could become corrupted and non-recoverable. Restarting or shutting down your computer, putting the hard disk to sleep, or closing your laptop will interrupt the conversion process.
If the conversion process is not successful after the meeting has ended, you can try to convert the files again by navigating to the recording location and double clicking the recording files.
You can upload, view, share, and edit files with Google Drive. When you upload a file to Google Drive, it will take up space in your Drive, even if you upload to a folder owned by someone else.
Upload & View Files
On your computer, you can upload fromdrive.google.com. You can upload files into private or shared folders.
If you don’t want to send an email to people, click Advanced and uncheck the Notify people box. If you notify people, each email address you enter will be included in the email.
Click Send.
Share a Link to the File
You can send other people a link to your file so anyone on the internet with the link can use it. When you share a link to a file, your name will be visible as the owner of the file.
At the top right, click Get shareable link.
Next to "Anyone with the link," click the Down arrow .
Copy and paste the link in an email or any place you want to share it, such as Moodle.
Resources for assistance or followup questions and concerns.
Contact UNC Asheville's Information Technology IT Service Desk for assistance in implementing the above described services and support. Email: itservicedesk@unca.edu or by calling 828.251.6445
Contact UNC Asheville's Center for Teaching and Learning unit for pedagogy and teaching strategies regarding this knowledge base article. Email: ins_tech@unca.edu. or by calling 828.251.6540
Use the Zoom Video Communication system knowledge base for Zoom meeting specific support questions or concerns. www.zoom.us/support
JavaScript errors detected
Please note, these errors can depend on your browser setup.
If this problem persists, please contact our support.