
Cloud Recording Audio Transcription
Zoom's Audio transcript feature provides an alternative method for post event audience members to understand the content if they cannot hear the program audio. This inability may result from technical (no computer speakers or low Internet broadband connection), environmental (multiple web conference users living in the same location, or a noisy location) or physical (hearing attenuation) issues. The use of the below information will provide contextual assistance for using this function.
Zoom Meeting or Webinar platform participants needing access to 'audio to text conversion' features after a Zoom event may utilize the transcript provided by the Zoom Cloud Recording audio transcription feature. Audio transcription will automatically generate a searchable text transcript of the audio, and make this transcript available in Zoom's video player. The text of the transcript can also be displayed in the player as closed captions. The audio transcription feature automatically transcribes the audio of a meeting or webinar that you record to Zoom Cloud Recording resources and makes it available after the event has ended. Access to post event Cloud Recordings files are controlled by the individual licensed account owner.
The Cloud Recording audio transcript feature must be enabled by the account holder (host) prior to be beginning of the event.
NOTES:
- While Zoom Video Communication systems provide assistive technology solutions users (Zoom Meeting and Zoom Webinar), these solutions are not intended to replace purpose built ADA accommodation services or systems that are recommended for compliance accommodation needs. Contact the Student Academic Accessibility Office for questions or concerns regarding access to more advanced accommodation services).
- Zoom Cloud Recording servers typically require 24 to 72 hours to complete the rendering process required to create audio transcripts and make them available to the licensed account host.
- After transcripts are processed, they appear as a separate VTT file in the list of recorded meetings available to the Zoom event host.
- The Zoom event host that scheduled the meeting will receive Email notification when the file has completed rendering and is available for use.
STEP 1: Enabling Cloud Recording Audio Transcription
All campus Zoom Meeting settings have been enabled to allow for use of this Zoom platform feature.
- Account Holders must enable the Cloud Recording audio transcript feature within their individual Zoom Meeting licensed account prior to the beginning of the scheduled event.
Hosts must log into their account via the Zoom Web Client to change the Cloud Recording settings.
![]()
- This setting confirmation is only necessary once as Zoom Setting changes are retained until new changes are made.
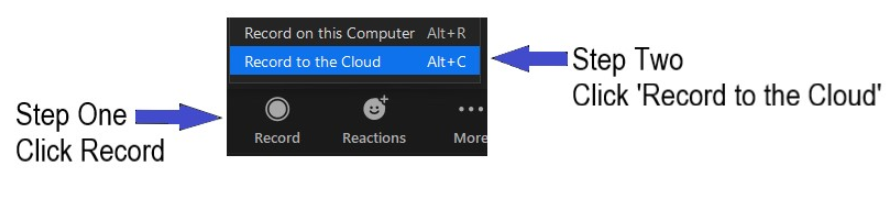
Step 2: Recording the Event
Once the meeting has stated, the Host must click on the Recording tab and select Cloud Recording to begin recording.
Step 3: Stop recording once the presentation is completed, or the event has ended
STEP 2: Generating a transcript
The Zoom event host that scheduled the meeting will receive Email notification when the file has completed rendering and is available for use.
The Individual licensed account holder / Meeting host may forward the shared link to anyone needing access to this event audio transcript. If the audio transcript is related to a curricular event, UNC Asheville FERPA policies and procedures must be complied with.
(Click here for further FERPA policy information)
The workflow process utilizes five steps: 1) Enabling Zoom Cloud Recording audio transcription, 2) Generating an audio-text transcript, 3) Viewing and editing the transcript, 4) Displaying the transcript as closed captions, and 5) Searching within the transcript. The created VTT file may be edited as a normal TXT file and is divided into sections, each with a timestamp that shows how far into the recording that portion of the text was recorded. You can edit the text to more accurately capture the words, or to add capitalization and punctuation, which are not captured by the transcript.
(Click here for the full Zoom Support Help Group article)
STEP 1a: Generating a transcript. The Meeting Host starts a scheduled Zoom platform event and starts Cloud Recording by clicking on the Record tab located on the Zoom platform tool bar.

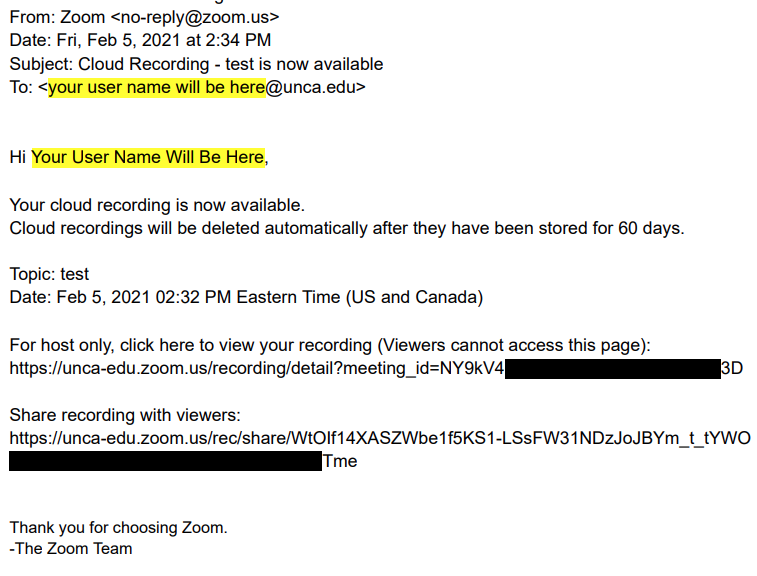
STEP 1b: After the meeting ends and the cloud recording audio transcript has finished rendering, you will receive an email that lets you know that your audio transcript is available. This emails will include links to view and share with others your transcript.
---------- Forwarded message ---------
From: Zoom <no-reply@zoom.us>
Date: Fri, Feb 5, 2021 at 2:34 PM
Subject: Cloud Recording - test is now available
To: <your user name will be here@unca.edu>
Hi Your User Name Will Be Here,
Your cloud recording is now available.
Cloud recordings will be deleted automatically after they have been stored for 60 days.
Topic: test
Date: Feb 5, 2021 02:32 PM Eastern Time (US and Canada)
For host only, click here to view your recording (Viewers cannot access this page):
https://unca-edu.zoom.us/recording/detail?meeting_id=NY9kV4q4TPOAlUcJ3pfgKQ%3D%3D
Share recording with viewers:
https://unca-edu.zoom.us/rec/share/WtOIf14XASZWbe1f5KS1-LSsFW31NDzJoJBYm_t_tYWOn4yxl4rgXIdCaFs7qSZ-.flnNx1dYASWJITme
Thank you for choosing Zoom.
-The Zoom Team
Note: The audio transcript may take additional time to process after the cloud recording video/audio has processed.
STEP 3: Viewing and editing the transcript
Audio transcripts are saved in VTT format. If you download the VTT file, you can open it with a text editor or word processing application. You can also view or edit transcripts in the web portal.
- Sign in to the Zoom web portal.
- In the navigation menu, click Recordings.
- Click the name of the recorded meeting.
You will see a list of recording files.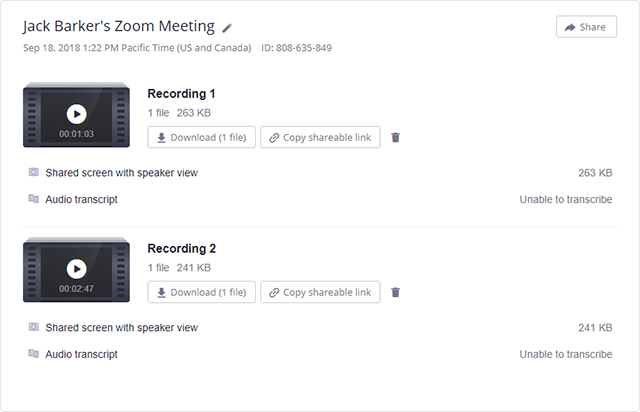
- Click the play icon.
The text of the transcript displays on the right-hand side of the video. - Hover over a phrase you want to edit and click the pencil icon.
Note: If a phrase belongs to an unknown speaker, you can also hover over Unknown Speaker and click the pencil icon to edit the name.
- Make any changes to the text, then click the check mark.
The updated version of the text is displayed when you play the audio or video file.
Step 4: Displaying the transcript as closed captions
The transcript is automatically embedded within the audio and video file, but is hidden by default. To see the transcript in the audio or video file:
- Sign in to the Zoom web portal.
- In the navigation menu, click Recordings.
- Click the name of the recorded meeting.
You will see a list of recording files. - Click the play icon.
- Click the CC icon at the bottom right of the screen.
The text displays on top of the video, similar to closed captioning.
![]()
Step 5: Searching within the transcript
You can search for text within the transcription and you can search for transcribed recordings that include the text you are searching for.
- Sign in to the Zoom web portal.
- In the navigation menu, click Recordings.
- In the Search by list, choose Keyword.
- Type a word or phrase in the text entry box, then click Search.
Note: This shows the list of meetings that includes the keyword in the transcript. - Click the applicable meeting to view the transcript.
- Click Audio transcript. The text of the transcript displays on the right-hand side of the file.
- Navigate to the Audio Transcript panel on the right and type the keyword into the search box at the top. All instances of the keyword are highlighted.

Additional related knowledge base articles include:
- Zoom Accessibility Features and Settings
- Audio Transcriptions for Zoom Cloud Recordings
- Live Transcriptions
Resources for assistance or follow up questions and concerns.
Contact UNC Asheville's Information Technology IT Service Desk for assistance in implementing the above described services and support. Email: itservicedesk@unca.edu or by calling 828.251.6445
Contact UNC Asheville's Center for Teaching and Learning unit for pedagogy and teaching strategies regarding this knowledge base article. Email: ins_tech@unca.edu. or by calling 828.251.6540
Use the Zoom Video Communication system knowledge base for Zoom meeting specific support questions or concerns. www.zoom.us/support