SURE GLX D4 Wireless Lapel Mic Detailed Instructions
Battery and Charging
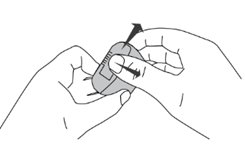
- To install or remove the battery from the mic transmitter move the locking lever to the open position and slide the battery door open.
- When not in use, the mic transmitter battery can be charged on the receiver unit. Insert the battery into the charging bay and monitor the battery charging indicator on the front panel for charge status. Red means the battery is charging, green means the charge is complete.
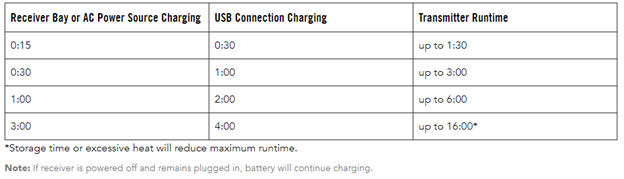
- Use the following table to determine the approximate battery runtime based on the duration of charging time:
Receiver/Transmitter Pairing and Signal
- Receiver/transmitter pairs will be preconfigured by ITS Please follow the steps below if they are not connected or you experience issues with interference.
- Turn on the wireless receiver with the on/off switch on the back of the unit.
- If necessary, change the group by holding the group button on the front of the receiver. Once the group number begins to flash, each successive press of the group button will advance the group number by 1 increment. Groups 1, 2, and 4 can be used.
- If necessary, press the channel button to scan for the best available channel.
- Turn on the transmitter with the on/off switch on the top of the bodypack unit. The blue RF light on the receiver will illuminate when a connection is made to the transmitter.
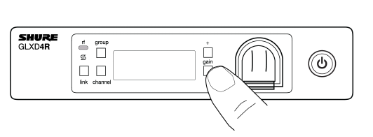
Adjusting the Gain (mic volume)
- Turn on the linked transmitter and momentarily press the gain buttons to adjust the gain in 1 dB increments
- For faster gain adjustments, press and hold the gain buttons