XMediusFAX Web Client
This guide is intended to provide general information on how to access and use the XMediusFAX Web Client. One notable drawback to the XmediusFAX Web Client is that there is no way to easily preview an outbound fax prior to sending it. The outbound fax can however be viewed in the Outbound History after the fax has been sent.
Requesting an XMediusFAX account: Your school account must be associated with a fax number. This is typically by department and is usually given out by a department head or administrative assistant. Please reach out to your department and find out your fax number, and then submit a ticket to ITS including that number to be set up to use XmediusFAX
Using the XMediusFAX Web Client: Open a web browser and navigate to https://faxing.unca.edu. A popup box will request user authentication credentials. To authenticate enter valid UNC Asheville username and password. All main web browsers are supported, including: Microsoft Internet Explorer, Mozilla Firefox, Google Chrome, Opera and Safari.
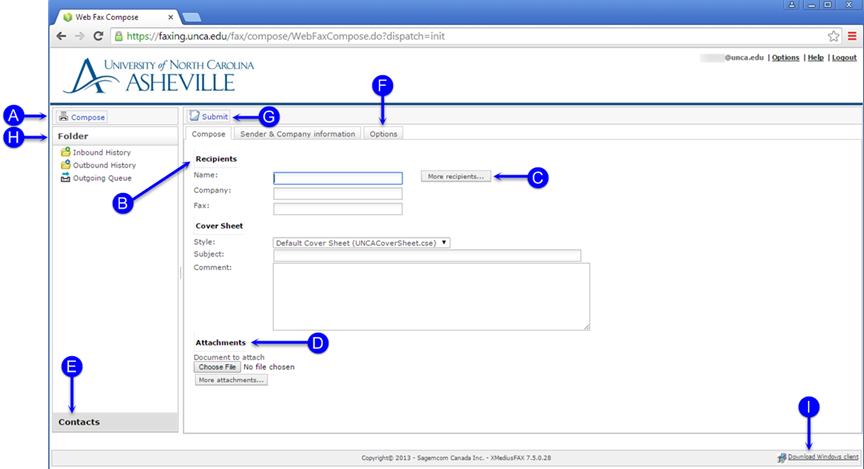
The diagram below highlights some of the key components of the XMediusFAX Web Client:

- To send a new fax, begin by clicking the ‘Compose’ button in the upper left corner of the page. Upon clicking the ‘Compose’ button, the screenshot above will be presented.
- The Recipients section is where to enter the name, company and fax number for your outbound fax. Note: Only the fax number is required. The fax number can be entered as a 7 digit number if it is local and all long distance phone numbers must include the area code. The system will ignore any dashes and parentheses that are entered when sending the outbound fax. For 1-800 numbers, leave off the 1 and enter the number using the following format: 800XXXXXXX.
- The 'More recipients' button to the right of the 'Recipients' section allows for more recipients to be added to the outbound fax.
- The 'Attachments' section is where files can be added to the outbound fax by clicking the 'Choose File' button, and selecting the file intended for the outbound fax. Multiple attachments may be sent in the outbound fax by clicking the 'More attachments' button and selecting additional files.
- The 'Contacts' button is used to display the Contacts page of the fax system. This is where new contact information can be added, edited and deleted.
- The 'Options' tab allows users to change some options such as fax priority level, number of retries, resolution and fax transmission time if the default options are not sufficient.
- The 'Submit' button is used to immediately send the outbound fax.
- The 'Folders' section contains three folders:
- Inbound History - this view displays inbound fax history of the past 30 days and offers a user various options to manage faxes, by using buttons such as: Mark as viewed, Mark as unviewed, Delete, and Forward.
- Outbound History - this view displays outbound fax history for the past 30 days and offers a user various options to mange faxes, by using buttons such as : Resubmit, Mark as viewed, Mark as unviewed, and Delete
- Outgoing Queue - this view displays the status of faxes that are currently being sent or waiting to be sent and also contains any fax for which the destination has returned a busy signal as well as any fax for which you entered a transmission delay (for scheduled faxing).
- The link below (I) is a download link for the Windows SendFAX client which as some advantages for heavy fax users.
