|
The new campus image includes Office 2013, an upgrade from our previous image's Office 2010. The following article details some of the changes in the newer version.
For more information on Office 2013, as well as details about individual programs, please visit the Microsoft Support site below:
Getting Started with Office 2013
On Opening the First Time:
-
Office will run a short activation prompt the first time a user opens an Office program (Word, Excel, etc), automatically activating their programs. This prompt resembles an installation prompt, is rather quick, and requires no input from the user. Once the activation completes, the program will open.
-
The first time the program runs, the user will be prompted with a "First Things First" window, asking how Office should handle updates. The user should choose "Use recommended settings," which will install important/recommended updates for Office, as well as report problems/crashes to Microsoft. Once this is chosen, the user can click "Accept".
3. Finally, Office will pop up a one-time "Welcome to Office" window that introduces the user to the 2013 Office experience. The user may click "Next" to review these changes, or click the "X" at the top-right of the window to use their program without the introduction.
Interface:
(similar to Office 2010, aside from the following changes)
-
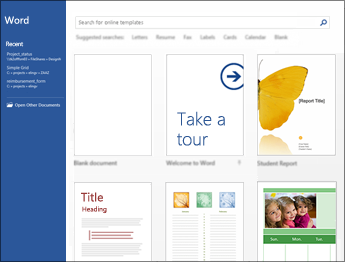
The program opens to a "Recent Documents" and "Templates" screen, where the user can choose a recently-edited document to open, or click "Blank Document" or another template to create a new document.
-
If the user wants to open a document form their computer which does not appear on the "Recent Documents" pane, they can choose "Open Other Documents," located below the list of Recent Documents.
-
Office 2013 now uses "panes" instead of pop-ups. This mimics a folder structure in Windows Explorer, but may seem a bit odd at first. To see this, click on the "File" tab at the top left of a document. The left pane shows which heading the user is looking at, and the right pane reveals the structure below this setting.
For example, if the user click "File," the highlights the "Open" heading in the left-side pane, the "Open" options appear in the center pane, with the options to chose "Recent Documents," "OneDrive" (cloud saved documents), or "Computer" (documents saved on the local computer). This center pane, currently "Open," is also a series of headings. For example, if a user clicks on "Computer," the far-right side becomes a list of recent folders, as well as an option to browse their computer for a document.
|
.png)